This blog is the first of two which will cover using the Cloudera distribution: #1 Pre-Cloudera Setup/Architecture and #2 Cloudera Installation.
The target audience are companies with data that is on the cusp of the “big data” label (think the three V’s). We will be placing a larger emphasis on the pre-cluster setup from a freshly installed OS to being read to install Cloudera via Cloudera Manager. This is often overlooked and always leads to trouble from the get-go.
Introduction
In the past, I have worked with a few companies that were considering making the leap into the big data world. This can be quite daunting of a task; especially with the ever-changing Hadoop ecosystem.
In almost all these cases, it was beneficial to demo the available quick start tools that some of the major Hadoop distributions provide, namely Cloudera and Hortonworks. Even though the quick start tools take advantage of pseudo-Hadoop, they generally do not provide enough flexibility to scale out to prove more complex data scenarios. From an engineering standpoint, these types of demonstrations often provide little value in proving the feasibility of making the leap to Hadoop, but can however be used for individual learning.
Architecture
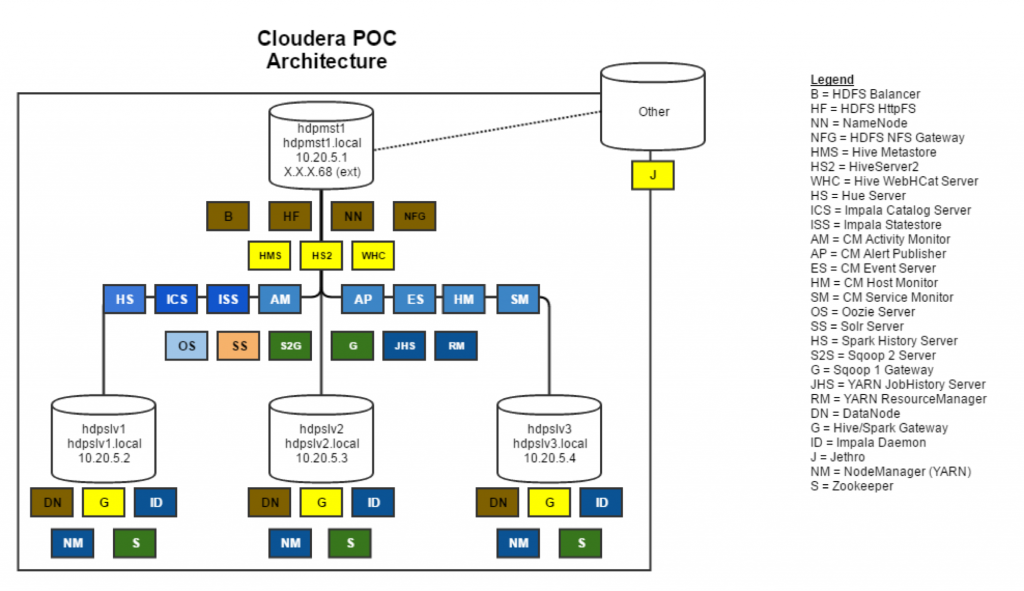
The following illustration shows the architecture we will be using for this POC setup. Basically, it will be a 4 node cluster with one external connection that will be discussed in an additional blog after the Post-Cloudera Installation Configuration. It is always preferable to use actual dedicated Linux machines. CentOS 6.5+ works well, but oftentimes when doing a POC, these may not be handy, so for this 4 node cluster, we will use one beefy Windows Server box and split it into 4 virtual machines using Oracle Virtualbox.
VM Specification
The machines can follow any naming convention, but for this blog we will name them with the hdp prefix (hdp for Hadoop), and the purpose of the machine as the suffix along with a number. MST will denote the Master or NameNode, SNN would be Secondary NameNode which is not going to be used, and SLV# will denote a DataNode.
Hdpmst1: 64GB RAM, 4 Cores, 1x500GB Hard Drive
Hdpslv1-3: 12GB RAM, 2 Cores, 1x1TB Hard Drive
The figure below labels all the services each machine will have installed:
Prior to installing Cloudera, there are a few configuration tasks that need to be done on each of the virtual machines. Instead of performing the following tasks on each machine individually, it is recommended to perform them on one machine, then export them as an appliance (shown in the appendix), then re-import it and rename it. This section will assume we are setting up one machine with the intent to export/import and repurpose it.
Downloads & Installs
The following items should be installed if they are not already. Terminal commands will be in green and changes to configuration files will be illustrated in orange.
cifs-utils
(This will be used for mounting drives or shares)
[root@ hdpmst1 ~]# yum -y install cifs-utils
ntp
Install ntp
   [root@ hdpmst1 ~]# yum -y install ntp
   [root@ hdpmst1 ~]# vi /etc/ntp.conf

   # line 18: add the network range you allow to receive requests
   restrict 10.0.0.0 mask 255.255.255.0 nomodify notrap
   # change servers for synchronization
   #server 0.centos.pool.ntp.org iburst
   #server 1.centos.pool.ntp.org iburst
   #server 2.centos.pool.ntp.org iburst
   #server 2.centos.pool.ntp.org iburst
   #server 3.centos.pool.ntp.org iburst
   server ntp1.jst.mfeed.ad.jp iburst
   server ntp2.jst.mfeed.ad.jp iburst
   server ntp3.jst.mfeed.ad.jp iburst

   [root@ hdpmst1 ~]# chkconfig ntpd on

   [root@ hdpmst1 ~]# systemctl start ntpd

   [root@ hdpmst1 ~]# systemctl enable ntpd
Synch node with the NTP server
[root@ hdpmst1 ~]# ntpdate -u <NTP Server Here>
Synch node system clock
[root@ hdpmst1 ~]# hwclock --systoch
Verify that ntpd is running
   [root@ hdpmst1 ~]# ntpq -p
     remote           refid      st t when poll reach   delay   offset  jitter
==============================================================================
+ntp1.jst.mfeed.   172.X.X.X     2 u   29   64    1   18.826   -0.126   0.000
+ntp2.jst.mfeed.   172.X.X.X     2 u   28   64    1   21.592    0.018   0.000
*ntp3.jst.mfeed.   133.X.X.X     2 u   28   64    1   22.666   -1.033   0.000
(Source: https://www.server-world.info/en/note?os=CentOS_7&p=ntp)
Pre-Install Configurations
The following configurations should be done prior to starting the Cloudera install.
Terminal commands will be in green and changes to configuration files will be illustrated in orange.
/etc/hosts
Setup the cluster hosts
   [root@ hdpmst1 ~]# vi /etc/hosts

   127.0.0.1   localhost localhost.localdomain localhost4 localhost4.localdomain4
   ::1         localhost localhost.localdomain localhost6 localhost6.localdomain6

   # Internal cluster connections
   # Master Nodes
   10.20.5.1       hdpmst1.local   hdpmst1

   # Slave Nodes
   10.20.5.2       hdpslv1.local   hdpslv1
   10.20.5.3       hdpslv2.local   hdpslv2
   10.20.5.4       hdpslv3.local   hdpslv3
/etc/resolv.conf
Enter your nameserver(s) here
   [root@ hdpmst1 ~]# vi /etc/resolv.conf
   nameserver 10.0.0.1
   nameserver 10.X.X.X
/etc/sysconfig/selinux
   [root@ hdpmst1 ~]# vi /etc/sysconfig/selinux

   # This file controls the state of SELinux on the system.
   # SELINUX= can take one of these three values:
   #     enforcing - SELinux security policy is enforced.
   #     permissive - SELinux prints warnings instead of enforcing.
   #     disabled - No SELinux policy is loaded.
   SELINUX=disabled

   # SELINUXTYPE= can take one of these two values:
   #     targeted - Targeted processes are protected,
   #     mls - Multi Level Security protection.
   SELINUXTYPE=targeted
/etc/sysconfig/network
HOSTNAME should be changed on each machine once the initial setup machine is cloned. This means, for example, that hdpslv1 would have HOSTNAME=hdpslv1.local.
   [root@hdpmst1 ~]# vi /etc/sysconfig/network

   NETWORKING=yes
   HOSTNAME=hdpmst1.local
/etc/sysconfig/network-scripts
We need to configure both eth0 and eth1 – those configurations are shown here for the initial machine and master node, hdpmst1. Again, it is important to note that the IPADDR and HOSTNAME needs to change once the machine is cloned and renamed for eth1.
   [root@ hdpmst1 ~]# vi /etc/sysconfig/network-scripts/ifcfg-eth0

   DEVICE=eth0
   TYPE=Ethernet
   ONBOOT=yes
   NM_CONTROLLED=yes
   BOOTPROTO=dhcp
   HWADDR=08:00:27:98:73:C7
   DEFROUTE=yes
   PEERDNS=yes
   PEERROUTES=yes
   IPV4_FAILURE_FATAL=yes
   IPV6INIT=no
   NAME=eth0
   HOSTNAME=hdpmst1.local
   [root@ hdpmst1 ~]# vi /etc/sysconfig/network-scripts/ifcfg-eth1

   DEVICE=eth1
   TYPE=Ethernet
   ONBOOT=yes
   NM_CONTROLLED=no
   BOOTPROTO=none
   DEFROUTE=yes
   IPV4_FAILURE_FATAL=yes
   IPV6INIT=no
   NAME=eth1
   PEERDNS=yes
   PEERROUTES=yes
   IPADDR=10.20.5.1
   NETMASK=255.255.255.0
   HOSTNAME=hdpmst1.local
Finally, we need to make sure the machine gets the IP assigned as well as the hostname.
   [root@ hdpmst1 ~]# ifconfig eth1 10.20.5.1 netmask 255.255.255.0
   [root@ hdpmst1 ~]# ifconfig

   eth0   Link encap:Ethernet  HWaddr 08:00:27:98:73:C7
          inet addr:10.0.2.15  Bcast:10.0.2.255  Mask:255.255.255.0
          inet6 addr: fe80::a00:27ff:fe98:73c7/64 Scope:Link
          UP BROADCAST RUNNING MULTICAST  MTU:1500  Metric:1
          RX packets:969718 errors:7 dropped:0 overruns:0 frame:0
          TX packets:893778 errors:0 dropped:0 overruns:0 carrier:0
          collisions:0 txqueuelen:1000
          RX bytes:506203964 (482.7 MiB)  TX bytes:387911327 (369.9 MiB)
          Interrupt:19 Base address:0xd020

   eth1   Link encap:Ethernet  HWaddr 08:00:27:C9:33:E1
          inet addr:10.20.5.1  Bcast:10.20.5.255  Mask:255.255.255.0
          inet6 addr: fe80::a00:27ff:fec9:33e1/64 Scope:Link
          UP BROADCAST RUNNING MULTICAST  MTU:1500  Metric:1
          RX packets:16033954 errors:0 dropped:0 overruns:0 frame:0
          TX packets:7389356 errors:0 dropped:0 overruns:0 carrier:0
          collisions:0 txqueuelen:1000
          RX bytes:11358234809 (10.5 GiB)  TX bytes:2356875364 (2.1 GiB)

   lo     Link encap:Local Loopback
          inet addr:127.0.0.1  Mask:255.0.0.0
          inet6 addr: ::1/128 Scope:Host
          UP LOOPBACK RUNNING  MTU:65536  Metric:1
          RX packets:52942701 errors:0 dropped:0 overruns:0 frame:0
          TX packets:52942701 errors:0 dropped:0 overruns:0 carrier:0
          collisions:0 txqueuelen:0
          RX bytes:106396678158 (99.0 GiB)  TX bytes:106396678158 (99.0 GiB)

   [root@ hdpmst1 ~]# hostname hdpmst1.local
   [root@ hdpmst1 ~]# hostname -f
   hdpmst1.local
Turn off iptables and reboot the machine
[root@ hdpmst1 ~]# chkconfig iptables off
/etc/rc.local
Disable Transparent Huge Pages by adding the following lines to the rc.local file. THP are detrimental to the performance of tools such as Hue.
   [root@ hdpmst1 ~]# vi /etc/rc.local
   ...other entries here…

   # Disable THP for Cloudera
   echo never > /sys/kernel/mm/transparent_hugepage/enabled
   echo never > /sys/kernel/mm/transparent_hugepage/defrag
/etc/sysctl.conf
Set vm.swappiness = 1 in the sysctl.conf file. We don’t want swapping during cluster operations plus Cloudera Manager will throw warnings.
   [root@ hdpmst1 ~]# vi /etc/sysctl.conf
   ...other entries here…

   # Control Swapping
   Vm.swappiness=1
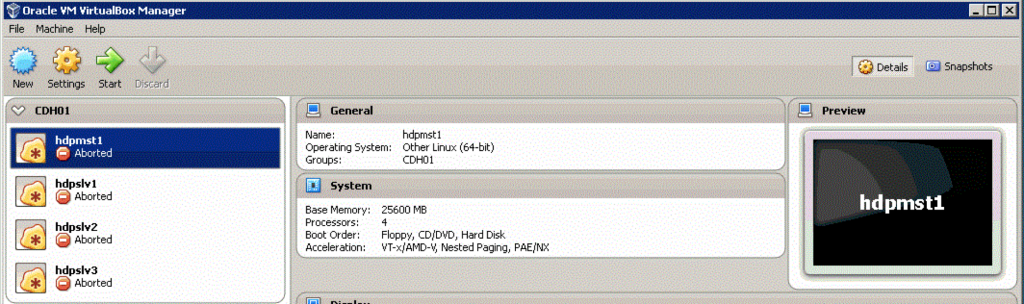
When you have configured all four machines, your setup should look something like the following within Oracle Virtual box (minus them saying Aborted – hah)
Conclusion
Now that you have 4 machines setup, talking to each other, and pre-configured, you are ready to install Cloudera using the installation bin they provide. These pre-configuration steps are important when setting up any cluster because they save you time versus navigating through the cryptic Cloudera Installer logs when the install does fail. See the next blog in the series (#2) for a detailed install explanation.